Washing hands is an important habit which helps get rid of illness-causing germs and keeps you healthy. It also removes dirt and stops microorganisms from spreading to other people.
Handwashing prevents people from picking infections, flu and other diseases like diarrhoea, food poisoning and passing on the same to others. The Centre for Disease Control and Prevention (CDC) says that handwashing is one of the best ways to protect ourselves and our family from falling sick.
When to wash your hands?
You should wash your hands often to stay healthy. It’s an easy way to protect yourself against infection and illness spread.
– Before and after preparing food – Before and after eating food – After using toilets or changing baby diapers – After coughing, sneezing or blowing nose – After touching garbage or any other waste material – After touching raw vegetables or meat – After touching animals, their feed or wastes – Before and after treating any kind of wounds – Before and after caring for any sick person at home
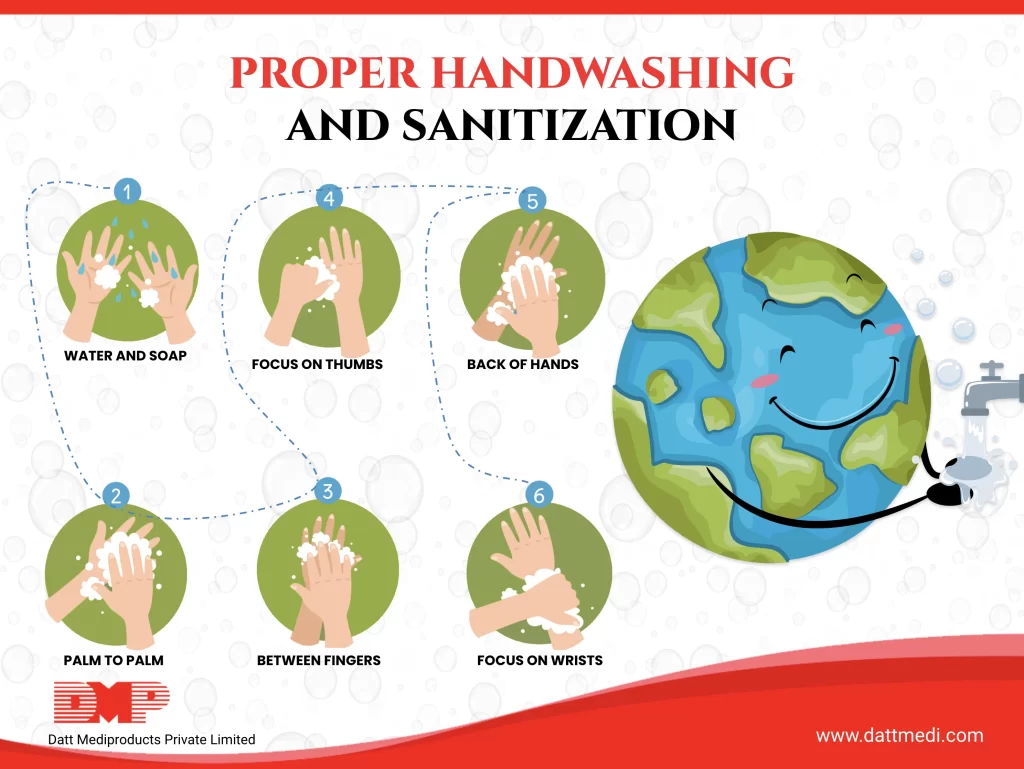
How to wash your hands properly? “The Five Steps”
STEP 1 – Wet your Hands: The first step in hand washing technique is to wet the hands with clean & running water, can be warm or cold.
STEP 2 – Apply Soap & Lather well: Apply enough soap to cover your hand and rub them together to lather in between the fingers, back of the hand and under the nails. Don’t forget the thumbs too.
STEP 3 – Scrub for 20 secs: WHO says that we should wash hands for at least 20 secs. Or till the time it takes to sing “Happy Birthday” song twice.
WHO recommends the following steps to properly scrub your hands:
– Rub both hands palm to palm. – Right palm over left dorsum with interlaced fingers and vice versa. – Palm to palm with fingers interlaced. – Back of fingers to opposing palms with fingers interlocked. – Rotational rubbing of left thumb clasped in right palm. – Rotational rubbing, backwards and forwards with clasped fingers of right hand in left palm and vice versa.
STEP 4 – Rinse your Hands: Rinsing should be done under clean and running water.
STEP 5 – Dry your Hands: Use a clean single use, disposable tissue to dry your hands or air dry them and close the faucet with the tissue itself.
“Science” Behind the 5 Steps of Washing Hands
Step 1 Wet your Hands: Running water is important as hands may become re-contaminated with stagnant water.
Step 2 Apply Soap & Lather: Washing hands with soap & water is proven to be more effective than water alone because the surfactants in soap help remove soil, dirt/dust along with microbes.
Step 3 Scrub for 20 secs: Rubbing hands for at least 20 secs causes friction and friction is important to remove germs from hands. as opposed to rubbing for a shorter time period.
Step 4 Rinse: Rinsing helps to remove the dirt/ grease/ germs from hands which have been lifted by the friction of rubbing.
Step 5 Dry: It’s important to dry the hands after washing as germs can be easily transferred to and from wet hands.
During this COVID-19 outbreak, WHO recommends washing hands frequently with soap and water to kill the virus that may be on your hands.
Follow us @Datt Mediproducts to keep updated about the latest facts and tips and to stay healthy.
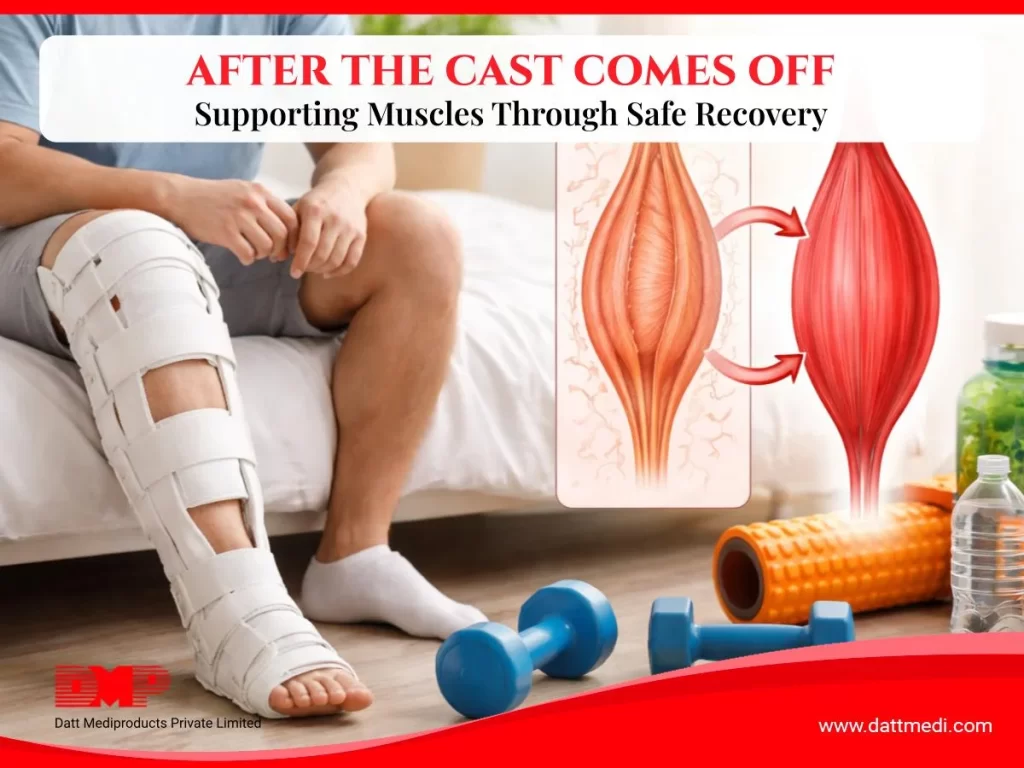
Coming out of a cast, brace, or splint is rarely as straightforward as it looks. The injury may have healed, but the surrounding muscles, joints, and soft tissue have spent weeks in a fixed position with limited activity. What follows is not a return to normal — it is the beginning of a second phase of recovery that requires just as much attention as the first.
This guide covers what actually happens to muscles and joints during immobilisation, how to rebuild strength and mobility safely, and which specific orthopaedic supports help — matched by body part and stage of recovery.
What Immobilisation Does to the Body
Muscle Deconditioning
Muscles maintain their strength through regular contraction. When a limb is immobilised, the muscles around it stop receiving the mechanical signals they need to stay strong. The result is a measurable loss of muscle mass and endurance — a process called disuse atrophy. Studies show that muscle strength can decline by as much as 3–5% per day in the early stages of immobilisation. Even a three-week cast can produce noticeable weakness in the surrounding musculature.
Joint Stiffness and Reduced Range of Motion
Joints rely on movement to stay healthy. Synovial fluid — the lubricant inside joints — circulates through movement. When a joint is held still for weeks, the surrounding capsule and ligaments begin to shorten and stiffen, and the range of motion decreases. Regaining that range requires deliberate, progressive movement — not just returning to normal activity.
Circulation and Swelling
Immobilised limbs often develop swelling because the muscle pump that normally drives venous return is inactive. Fluid accumulates in the soft tissue, particularly around the ankle and foot in lower limb immobilisation. This swelling can itself delay rehabilitation by limiting movement and causing discomfort.
The Four Phases of Returning to Movement
Phase 1: Protected Range of Motion
Immediately after immobilisation ends, the goal is gentle, pain-free movement — not strength. Ankle circles, wrist rotations, finger flexion, and similar small movements reintroduce the joint to its range without stressing the recovering tissue. Movement should stay within a comfortable range and never push into pain.
Phase 2: Circulation and Swelling Control
Before strength can return, swelling needs to reduce. Elevation, gentle movement, and compression where appropriate help manage fluid accumulation. This phase often runs parallel to Phase 1.
Phase 3: Strength Rebuilding
Once range of motion is partly restored and swelling is controlled, progressive resistance exercises can begin. Resistance bands are useful here because they allow graded loading — starting light and increasing gradually without placing sudden stress on healing tissue. Physiotherapy guidance is strongly recommended for this phase.
Phase 4: Functional Reintegration
The final phase returns the person to normal activity — walking, lifting, working, exercising — progressively. Supportive bracing may continue during this phase to provide stability while the muscles are still rebuilding.
The body rebuilds muscle tissue and bone using raw materials from diet. The following nutrients are most directly relevant during post-immobilisation recovery:
Protein — essential for muscle repair and rebuilding. Sources include eggs, legumes, dairy, fish, and lean meat. Aim for consistent intake across meals rather than one large serving.
Calcium — supports bone density and structural recovery, particularly relevant after fractures. Dairy products, fortified plant milks, and leafy greens are good sources.
Vitamin D — required for calcium absorption. Many people in India are deficient, particularly those with limited sun exposure. Supplementation is often advisable — check with a doctor.
Collagen precursors (Vitamin C, zinc) — support soft tissue and tendon repair. Found in citrus fruits, berries, nuts, and seeds.
Hydration — adequate water intake supports muscle function, joint lubrication, and circulation during rehabilitation.
Which Orthopaedic Support to Use — by Body Part and Stage
Supportive braces and sleeves serve two distinct roles during post-immobilisation recovery: they protect the recovering joint from excessive or sudden movement, and they provide proprioceptive feedback — helping the nervous system re-learn where the joint is in space. The right product depends on which body part was immobilised and what stage of recovery the person is in.
Supports spinal alignment and shoulder positioning as back and core muscles regain strength
Safe Guidelines for Early Movement
Always Get Clearance First
No exercise or movement programme should begin without confirmation from the treating clinician or physiotherapist that it is safe to do so. The timeline varies significantly depending on the type of injury, the location, and how healing has progressed.
Start Smaller Than You Think You Need To
The instinct after weeks of immobilisation is to move more to make up for lost time. This usually backfires. Muscles and tendons that have been inactive are more vulnerable to strain, and joint tissue is still adapting. Small, controlled movements performed consistently will restore strength faster than pushing into discomfort.
Pain Is a Signal, Not an Obstacle
Discomfort from stiffness is expected and normal. Sharp or worsening pain during exercise is not. If a movement causes significant pain, stop, and raise it with a healthcare professional before continuing.
Use Supports Correctly
A brace or support is most effective when sized and positioned correctly. An ill-fitting support — too loose or too tight — can create pressure points, restrict circulation, or provide false confidence that leads to overexertion. Follow sizing guidance for each product, and if in doubt, seek fitting advice.
When to See a Physiotherapist
Physiotherapy is not just for serious injuries. A physiotherapist can assess the specific degree of muscle weakness and joint restriction after immobilisation, design a graduated programme matched to the person’s actual capacity, and identify any complications — such as tendon tightness, abnormal movement patterns, or persistent swelling — that need addressing before progressing.
The end of immobilisation marks the beginning of rebuilding — not the end of recovery. Muscle deconditioning, joint stiffness, and residual swelling are normal consequences of keeping a limb still, and all of them respond well to progressive, consistent rehabilitation.
The right orthopaedic support — matched to the body part, the stage of recovery, and the level of activity — makes that process safer and more manageable. Browse the full Datt Mediproducts orthopaedic range to find the support that fits your recovery.
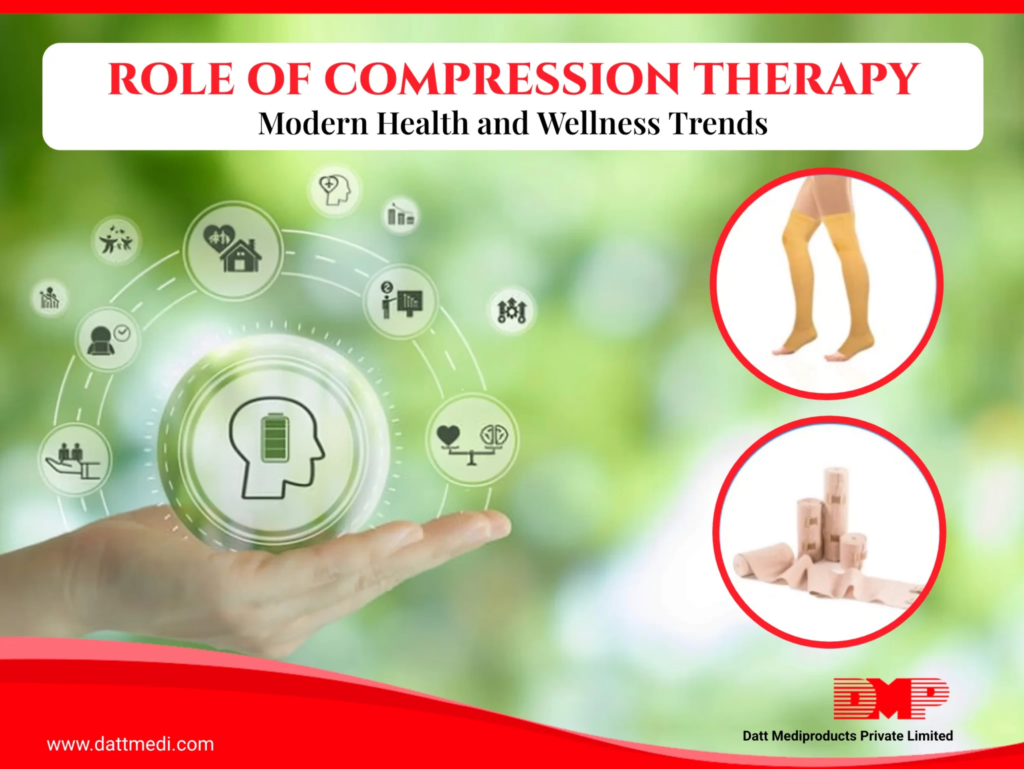
If your legs feel heavy, tight, or visibly swollen by the end of a long shift, you are not imagining it. Prolonged standing is one of the most common drivers of leg swelling in working adults — and it affects people in healthcare, retail, hospitality, manufacturing, teaching, and any other profession that keeps them on their feet for hours at a time.
This guide explains the underlying mechanism, the factors that make some people more susceptible than others, and what actually works to manage and prevent the problem — including when medical-grade compression stockings are the right tool.
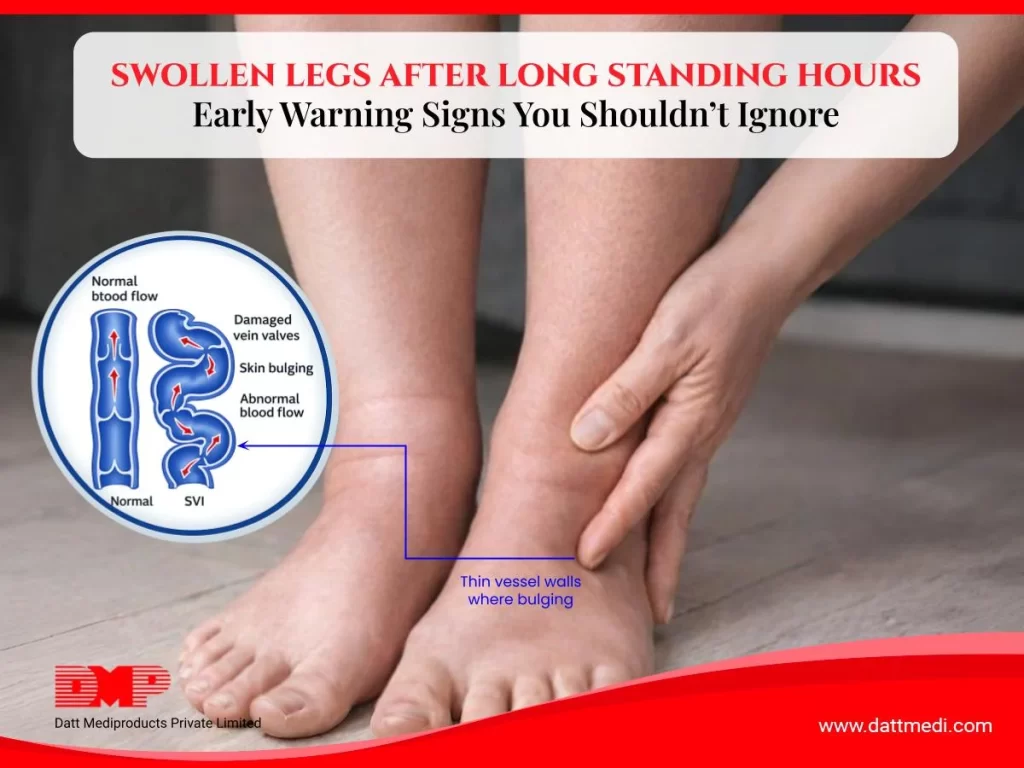
What Actually Causes Leg Swelling When You Stand
The heart pumps blood downward through arteries with little effort. Getting it back up through the veins — against gravity — is a much harder job.
The body relies on three mechanisms to do this:
Venous valves that prevent flowing backward
The rhythmic contraction of calf and leg muscles that squeeze blood upward
The elastic recoil of the vein walls themselves.
When you stand still for extended periods, the second mechanism — the muscle pump — largely switches off. Blood moves sluggishly in the lower leg veins, pressure builds, and fluid begins leaking through the vein walls into the surrounding tissue. This is venous pooling, and the visible result is swelling around the ankles and lower legs.
The swelling is typically worse at the end of the day and improves after lying down or elevating the legs, because horizontal positioning removes gravity from the equation. This pattern — worsening through the day, improving with rest — is the clearest indicator that prolonged standing is the primary cause.
Why Some People Swell More Than Others
1. Venous Valve Insufficiency
Healthy veins contain one-way valves that prevent blood from flowing back toward the feet between heartbeats. In some people, these valves weaken or become leaky — a condition called chronic venous insufficiency. When this happens, blood pools more easily, swelling occurs faster, and visible varicose veins may develop over time. People with venous insufficiency are significantly more affected by prolonged standing than those with healthy valve function.
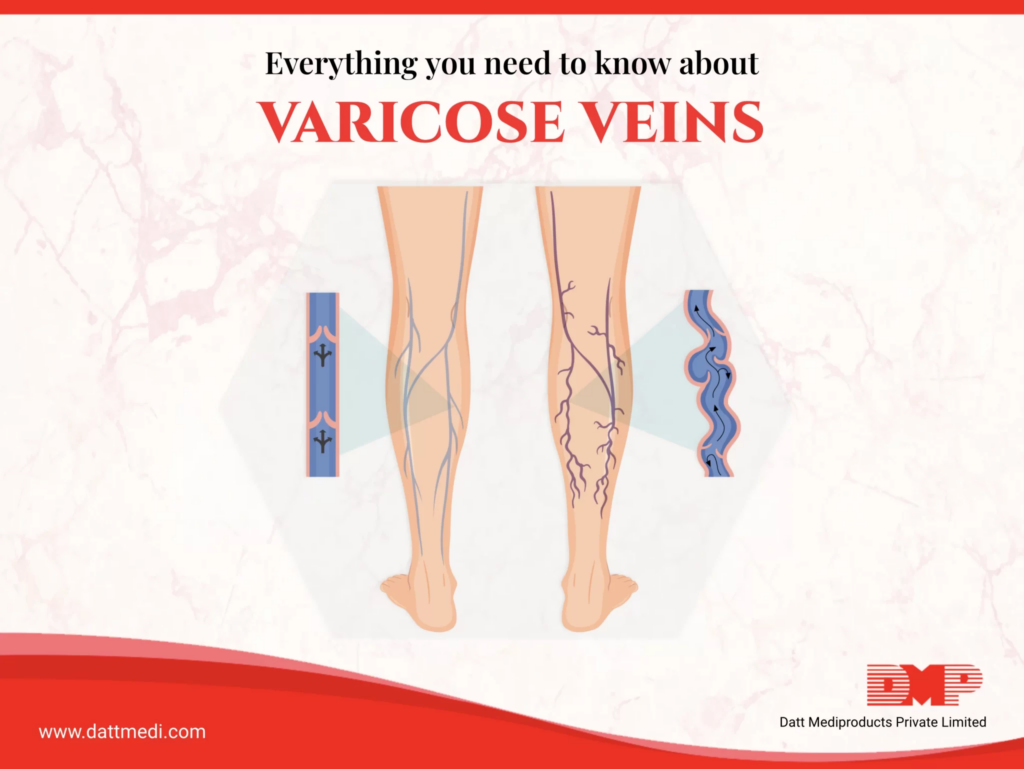
2. Varicose Veins
Varicose veins are enlarged, twisted veins that have lost their structural integrity. They are a direct consequence of venous valve failure and represent a more advanced stage of venous disease. Standing for long periods accelerates the pooling in these vessels and worsens both swelling and the aching, heaviness, and fatigue that accompany it.
Higher body weight places increased pressure on the venous system in the legs. Reduced physical fitness means the leg muscles — which are the primary pump for venous return — are less effective. Both factors increase susceptibility to standing-related swelling.
4. Occupation and Daily Pattern
The duration of unbroken standing matters more than total standing time. Someone who stands for eight hours but walks between tasks frequently will experience less pooling than someone who stands relatively still at a counter or workstation. The absence of walking breaks is a key risk factor.
When Swelling Needs Medical Attention
Swelling that follows the pattern described above — building through the day, resolving overnight — is generally benign and related to venous pooling. However, some patterns warrant prompt medical evaluation:
Swelling that is sudden, severe, or in one leg only — may indicate deep vein thrombosis (DVT)
Swelling accompanied by redness, warmth, or skin changes — may suggest infection or phlebitis
Swelling that does not improve after a full night’s rest
Swelling with associated chest pain, breathlessness, or palpitations — seek emergency care
Swelling in the context of heart, kidney, or liver conditions
If any of these apply, see a healthcare professional before starting any compression therapy.
Practical Measures That Reduce Standing-Related Swelling
Movement Breaks
Walking — even for two to three minutes per hour — reactivates the calf muscle pump and significantly reduces venous pooling. If walking is not possible, calf raises, foot circles, and toe pumps performed in place have a similar effect. The goal is to avoid completely static standing for long unbroken periods.
Leg Elevation After Work
Elevating the legs above heart level for 15–20 minutes after a long shift allows gravity to assist venous and lymphatic drainage. This is one of the most effective ways to accelerate overnight recovery and reduce residual swelling the next morning.
Footwear
Shoes with cushioned soles and low heels support natural foot movement and reduce fatigue. Tight footwear compresses the foot and can restrict venous return. Flat shoes without arch support reduce calf engagement during walking, which reduces the efficiency of the muscle pump.
Medical-Grade Compression Stockings
Compression stockings are the most evidence-supported intervention for managing venous pooling during prolonged standing. Unlike general support hosiery, medical-grade stockings apply graduated compression — highest at the ankle, reducing toward the knee or thigh — which mechanically assists venous return and prevents fluid from leaking into surrounding tissues.
Velcare® Varicose Vein Medical Compression Stockings
The Velcare® range from Datt Mediproducts is a medical-grade compression stocking designed specifically for venous conditions, including swelling from prolonged standing, phlebitis, varicose veins, venous insufficiency, oedema, deep vein thrombosis management, and post-surgical recovery.
Key specifications:
Class 2 compression: 23–32 mmHg — the clinical standard for moderate-to-severe venous conditions
Graduated compression: pressure is highest at the ankle and reduces toward the top of the stocking, actively assisting upward blood flow
70% Nylon, 30% Spandex: breathable, latex-free, and suitable for daily extended wear
Four-way stretchability: conforms to the leg without restricting movement
Soft construction: designed for comfort during long work hours
Available in S, M, L, XL
The Velcare® range is available in three styles to suit different clinical needs and preferences:
Style
Coverage
Best For
Open Toe, A-D (no silicone band)
Ankle to knee
Everyday leg swelling from standing; those who prefer open toe for breathability or foot conditions
Open Toe, A-D with Silicone Band
Ankle to knee
Users who need the stocking to stay in place securely without rolling down during a long shift
Open Toe, A-G with Silicone Band
Ankle to groin
More extensive venous conditions, post-surgical recovery, or where thigh-high coverage is clinically indicated
How to Use Compression Stockings Effectively
Put Them On Before Getting Up
Compression stockings work best when applied before venous pooling begins. Put them on in the morning before standing up, while the legs are still at their least swollen. Applying them after standing for an hour is significantly less effective.
Wear Through the Working Day
Keep the stockings on throughout the shift. Removing them mid-day and then reapplying is less effective than continuous wear during standing hours.
Remove in the Evening
Once you are off your feet and resting, the stockings can be removed. Compression is needed during the periods of venous stress — standing and walking — not during rest.
Sizing Matters
An incorrectly sized stocking — too loose or too tight — will not deliver the intended compression level. Measure ankle and calf circumference, and refer to the Velcare® sizing guide before ordering. When in doubt, consult a healthcare professional or pharmacist for fitting guidance.
Care and Longevity
Medical compression stockings should be washed regularly — typically after each wear — in cool water with gentle detergent. Air dry rather than tumble dry to preserve the elastic fibres. Most compression stockings require replacement every 4–6 months with regular daily use, as the elasticity gradually reduces.
Managing Leg Health Is a Daily Habit
Standing-related leg swelling is a physical consequence of how blood moves — or stops moving — during long hours on your feet. It is not inevitable. Movement breaks, appropriate footwear, evening elevation, and the right compression support together make a significant and measurable difference.
For people with varicose veins, venous insufficiency, or a job that keeps them standing for the majority of their working day, medical-grade graduated compression stockings are the most clinically supported intervention available. The Velcare® Varicose Vein Compression Stocking range is designed for exactly this context — durable, breathable, and calibrated to the compression level that delivers real results.